The Complete Guide to Establishing a Stunning Sod Lawn from Scratch
Pros and Cons of Using Sod for New Lawns
Pros of Using Sod:
- Instant Transformation: Sod instantly turns a barren space into a lush, green oasis.
- Erosion Control: Sod helps prevent soil erosion, especially on sloped areas. It provides immediate protection against water runoff.
- Weed-Free Start: Sod is typically grown in controlled environments, minimizing the presence of weeds. This gives your new lawn a head start without competing with unwanted plants.
Cons of Using Sod:
- Higher Initial Cost: Sod is more expensive upfront compared to seeding. The immediate results might justify the cost for some, but budget-conscious homeowners might find it pricier.
- Limited Grass Variety: Sod options might be restricted to the most popular grass types for your region. If you're seeking a unique or specific grass variety, your choices could be limited.
- Proper Installation Required: Sod installation demands meticulous preparation and attention to detail. A proper foundation, soil preparation, and installation techniques are crucial for success.
Best Time for Sod Installation

The best time to lay sod is during the cooler months of early fall or late spring. These transitional seasons offer the most favorable conditions for successful sod installation and establishment.
Early Fall: Ideal for Cool-Season Grasses
Certain grass varieties, such as Kentucky bluegrass, fescue, and ryegrass, thrive in cooler temperatures. As temperatures begin to moderate in early fall, it creates an optimal environment for these grass types to flourish. The milder temperatures in early fall not only support robust root development and rapid grass growth, ensuring a strong foundation for your new lawn, but they also reduce stress on newly laid sod, allowing it to settle in comfortably.
Late Spring: Perfect for Warm-Season Grasses
Warm-season grasses, including Bermuda, zoysia, and centipede grass, thrive in warmer temperatures. The natural growth cycle for these grass types peaks in late spring when warmer weather and increased sunlight provide ideal conditions for growth. The warmer temperatures and ample sunlight in late spring not only accelerate the establishment and growth of warm-season grasses but also give the new sod time to root deeply before facing summer's more intense heat.
Tools and Materials for Laying Sod
Tools
- Sod cutter or shovel: For removing existing grass and preparing the area.
- Rake and wheelbarrow: To level the soil and transport materials.
- Lawn roller: Essential for pressing the sod into the soil for proper contact.
- Soil testing kit: To assess soil pH and nutrient levels for optimal growth.
- Water source and sprinklers: Necessary for keeping the newly laid sod consistently moist.
Materials:
- Topsoil and compost: Providing a nutrient-rich base for healthy root development.
- Sod: The star of the show, providing instant lawn gratification.
- Organic material: Enhances soil structure and promotes long-term soil health.
- Fertilizer: Supporting initial growth and establishment.
- Soil amendments: Tailoring soil composition to suit your grass type's preferences.
Step-by-Step Guide to Laying Sod
Before You Begin
Choose the Right Type of Sod
For regions with warm climates, consider warm-season grasses available as sod:
- Bermudagrass (hybrid)
- Buffalograss
- Kikuyugrass
- Seashore paspalum
- St. Augustinegrass
- Zoysiagrass
Keep in mind that warm-season grass sod usually consists of only one variety.
If you're in a cooler climate, opt for cool-season grasses available as sod:
- Bentgrasses (certain varieties)
- Hard fescue (often mixed with Kentucky bluegrass)
- Kentucky bluegrass (often mixed with perennial ryegrass and/or fine fescues)
- Perennial ryegrass (typically mixed with Kentucky bluegrass)
- Red fescue (often mixed with Kentucky bluegrass)
- Tall fescue
Cool-season grass sod often contains multiple varieties of the same species.
Prior to laying new sod, take the time to perform a complete soil analysis. You can buy home soil test kits or send samples to a lab for a detailed scientific evaluation. The test results will provide key data including:
pH Levels: This measures acidity versus alkalinity. Most grasses thrive when the pH range is between 6.0-7.0. If the pH is too high or low, lime or sulfur can adjust it.
Macronutrients: Primary nutrients like nitrogen, phosphorus and potassium should be present in ideal proportions. Fertilizer can enrich deficiencies.
Micronutrients: Essential trace elements like calcium, magnesium and iron should be at optimal levels.
Organic Matter Content: A minimum of 3-5% organic material improves moisture retention.
Armed with your soil analysis results, you can correct issues by adjusting pH, enhancing fertility, improving drainage, or incorporating organic matter into the soil. This tailors the root zone to maximize the health of your sod.
Preparing the Lawn Site
Remove Existing Vegetation
Start by thoroughly clearing the area of any remnants from the previous lawn, including old grass, weeds, and debris. This clean slate ensures that the sod you're about to lay down has a fresh and uncontested foundation.
For larger areas, consider using a sod cutter. This efficient tool will help you strip away existing growth evenly and quickly, creating a blank canvas that's ready for your new sod.
Clean and Level the Area
Survey the landscape and address any unevenness. Fill in depressions with appropriate soil, while simultaneously removing any raised areas that could disrupt the even settling of your sod.
Raking the soil is essential at this stage. This step not only levels the surface but also breaks up any clumps, creating a smooth texture that facilitates proper sod-to-soil contact.
Till and Rake the Soil
Compacted soil can impede root growth and establishment. Using a tiller to loosen the soil is crucial, as it enhances aeration and makes it easier for roots to penetrate.
After tilling, further refine the soil's texture with a rake. This process eliminates any remaining clumps, ensuring that the sod lays evenly and connects well with the soil beneath.
Add Topsoil and Organic Material
Elevate your soil's nutrient content and structure by applying a layer of high-quality topsoil. This layer provides the necessary nutrients for the initial stages of root growth.
To enhance soil structure and water retention, incorporate organic materials like compost. This addition improves the soil's overall quality, providing an ideal environment for roots to flourish.
Incorporate Soil Amendments
If you've conducted a soil test, it's time to act on its recommendations. Incorporating amendments tailored to your soil's specific needs is vital:
Lime: Balances soil pH and addresses acidity issues.
Sulfur: Counters alkaline soil conditions and lowers pH.
Nitrogen, Phosphorus, and Potassium: Addresses nutrient deficiencies based on soil test recommendations.
Organic Matter: Enhances soil structure, moisture retention, and nutrient availability.
These amendments, specific to your soil's characteristics, set the stage for healthy root growth and a thriving lawn.
Ensure a Smooth Surface
Before laying your sod, use a lawn roller to lightly compact the soil. This step minimizes air pockets, ensuring consistent and proper contact between the sod and the soil.
By meticulously following these preparatory steps, you're creating an environment that fosters successful sod installation and sets the foundation for a lush and enduring lawn.
Installing the Sod

With the groundwork carefully laid, it's time to proceed to the installation phase of your sod. Following these comprehensive steps ensures that your new lawn takes root successfully:
Moisten the Soil
Before you begin laying sod, it's essential to ensure that the soil is adequately moist. Lightly water the prepared area, aiming for a level of dampness that promotes good sod-to-soil contact without creating a soggy environment. Adequate moisture encourages the sod's roots to intertwine with the soil beneath, setting the stage for healthy growth.
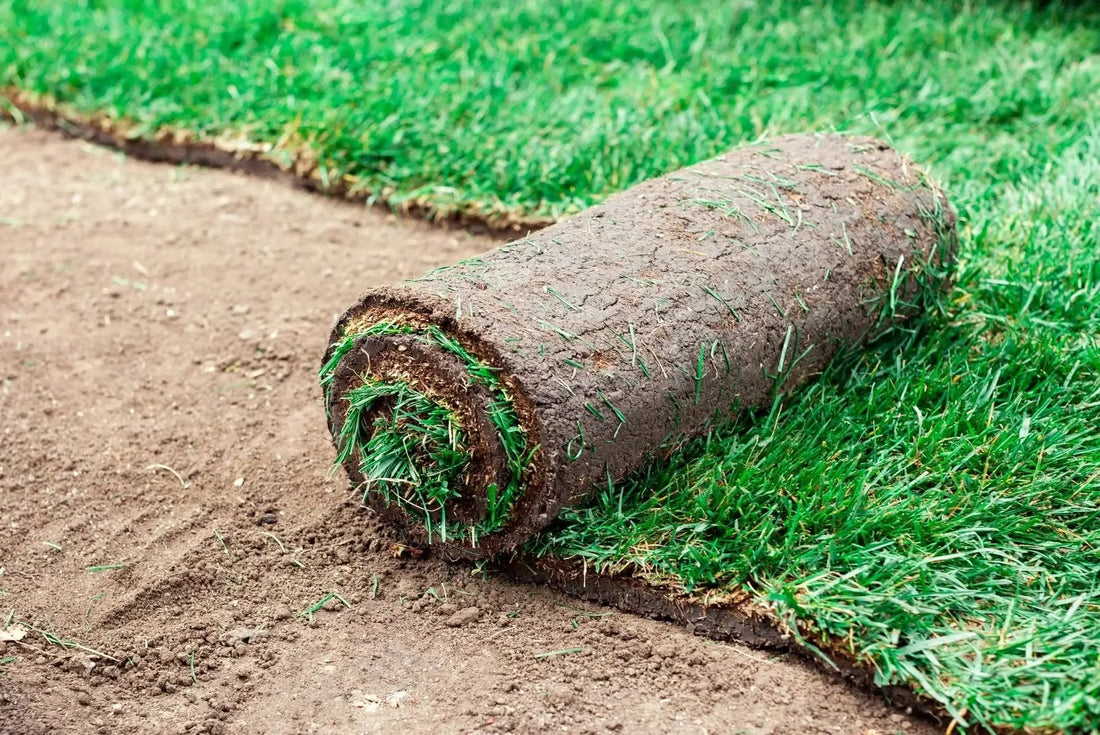
Lay the First Row
Starting with precision is key to a well-aligned lawn. Begin along a straight edge or property boundary to establish a reference line for the entire installation. Lay the first row of sod pieces tightly against this edge, ensuring they're in direct contact with the soil. This close alignment reduces the chance of gaps forming between the sod pieces.
Lay the Second Row
Continuing from where you left off, move on to the second row of sod. Stagger the seams between the pieces in this row, similar to how bricks are laid. This interlocking pattern enhances stability and aesthetics. As you place each sod piece, press it down firmly. This action eliminates air pockets that could hinder root growth and establishes direct contact with the soil.
Complete the Installation
Consistency is crucial as you work row by row to lay the sod across the entire prepared area. Avoid leaving gaps between the sod pieces to prevent weed infiltration and to create a uniform appearance. Neatly butt the edges of adjacent pieces together for a seamless finish.
As you approach the edges of the installation area, trimming becomes necessary for a polished look. Utilize a sharp utility knife to precisely cut sod pieces to fit around obstacles, edges, and borders. This attention to detail contributes to the overall visual appeal of your lawn.
Fix Low Spots
While laying sod, pay attention to any depressions or uneven areas in the soil. These low spots can lead to water pooling and hinder healthy grass growth. Address such areas by filling them in with soil, creating a level surface. By ensuring proper grading during installation, you're promoting effective drainage and a more consistent lawn.
Roll the New Lawn Surface
The final touch for optimal sod-to-soil contact is to use a lawn roller. Gently roll the surface to press the sod into the soil. This step eliminates any remaining air pockets and encourages the roots to anchor themselves firmly. The result is a secure and even connection between the sod and the soil, setting the stage for successful establishment.
Caring for Your New Sod
Watering as You Lay Your Sod
Proper hydration is essential during and immediately after sod installation:
Keep Sod Moist: Water the sod as you lay it down to prevent it from drying out. Adequate moisture promotes successful sod-to-soil integration.
Prevent Drying Out: Avoid letting the sod wilt or dry, especially during the installation process. Consistent moisture is key to a strong start.
Watering Until It Roots
For the initial weeks, diligent watering is critical to root development:
Water Daily: During the first two weeks, water your new sod daily. This routine provides the necessary moisture for the developing roots.
Gradual Frequency Reduction: As roots take hold, gradually reduce the watering frequency. This encourages roots to seek moisture deeper in the soil.
Watering Your Established Lawn

Transitioning to a sustainable watering routine promotes long-term health:
Deep and Infrequent: Shift to a deep and infrequent watering schedule once your sod is established. This encourages roots to grow deeper and enhances drought resistance.
Morning Watering: Water your lawn early in the morning to minimize evaporation. Morning watering also prevents prolonged moisture on the grass blades, which can lead to disease.
To further enhance your watering strategy, consider using a smart irrigation controller. These innovative devices utilize weather data and soil moisture levels to automate and optimize your watering schedule, ensuring your lawn receives the right amount of water at the right time. This modern approach not only promotes water efficiency but also contributes to the vitality and sustainability of your newly established sod.
Mowing and applying fertilizer
As your lawn matures, proper maintenance contributes to its vitality:
Wait Before Mowing: Allow your sod to root before mowing. Wait 2-3 weeks to ensure the sod has established a strong connection with the soil.
Follow Recommended Height: When mowing, adhere to the recommended mowing height for the specific sod type. Cutting at the right height supports healthy growth.
Apply Balanced Fertilizer: Regularly monitor your lawn's nutrient needs and apply a balanced fertilizer as required. This nourishes the grass and sustains its lush appearance.
Common Mistakes in Caring for Newly Sodded Lawns

Maintaining a vibrant and healthy sod lawn requires careful attention and avoidance of common pitfalls. By steering clear of these mistakes, you'll ensure your lawn's longevity and beauty:
Watering Too Frequently
Frequently overwatering a new sod lawn can negatively impact its root system development. When sod is watered too often, it encourages the growth of shallow grass roots rather than deep, extensive ones. This shallow root system leaves the new lawn vulnerable to stress and weather changes. Without deep roots to absorb water and nutrients, the lawn becomes more susceptible to drought, heat damage, and other environmental stressors.
Mowing Too Short
When grass is trimmed to an excessively short length, it weakens the plants and reduces their resilience against threats like pests, diseases, and heavy foot traffic. Additionally, the sparse coverage from overly-short grass provides an opening for weeds to take hold and compete with the desired lawn grass. It's important to consult and follow the recommended mowing height guidelines for your specific sod type in order to encourage healthy, vigorous grass growth.
Watering at the Wrong Time
When you water your new sod is as important as how much you water. Irrigating during the hottest parts of the day can lead to wasted water and added stress for the grass due to rapid evaporation. Conversely, watering in the evening results in moisture lingering on the grass blades overnight, which can promote fungal diseases.
The ideal time to water is in the early morning hours. This allows the water to soak into the soil and hydrate the roots while the cooler temperatures minimize surface evaporation. Morning watering reduces the risks of wasted water and disease development that accompany daytime and evening irrigation.
Fertilizing Too Much
While fertilization is important for healthy grass growth, over-fertilizing can actually damage your new sod lawn. Applying excess fertilizer can burn the grass roots and blades, creating unsightly brown patches and stressing the plants. Instead of boosting growth, overzealous fertilizer use hinders it. The key is to follow the recommended application guidelines for your specific sod variety in terms of amount and frequency. Measured fertilization provides nutrients for steady, vigorous growth without the risk of fertilizer burn.
Leaving Things Out on the Grass
Leaving objects sitting on your new sod lawn can stunt its growth and create unsightly patches. When items like furniture or yard debris are left on the grass, they physically block sunlight from reaching the blades. This lack of sunlight hinders photosynthesis, which grass relies on to build strong roots and blades. The areas covered by objects become deprived of light, often turning yellowish or brown. To prevent bare, uneven spots, it's important to regularly clear your lawn of any items obstructing sunlight access.
FAQs about Installing Sod for Your Lawn

Q: How much does sod installation cost?
The average cost to install sod is between $0.90 to $1.80 per square foot, including the cost of the sod itself, labor, and other materials. To get an accurate estimate, it's recommended to obtain quotes from local suppliers.
Q: How long does it take for grass sod to establish?
Grass sod usually establishes its root systems within approximately 2 to 3 weeks after installation. However, achieving full growth and maturity may take several months.
Q: Does sod turn into real grass?
Absolutely, sod consists of genuine grass that has been cultivated on a farm, and harvested with a layer of soil. Once installed, it establishes and grows in the same way as seeded grass.
Q: How to lay sod over an existing lawn?
Laying sod over an existing lawn involves proper preparation, including mowing the existing grass short, aerating, adding topsoil, and then laying the sod for proper adherence and growth.
Q: How should I prepare the soil for sod?
Soil preparation for sod entails clearing debris, tilling the soil, applying topsoil and compost, ensuring a level surface, and conducting a soil test to optimize conditions for successful growth.
Q: What are common sod-laying mistakes?
Common mistakes during sod installation include insufficient soil preparation, improper alignment of seams, over or under-watering, misalignment of pieces, and neglecting post-installation care.
Q: How to lay sod fast?
For efficient sod installation, ensure thorough preparation in advance, consider enlisting assistance, begin early in the day, maintain precise alignment of pieces, and have all necessary tools ready for use.